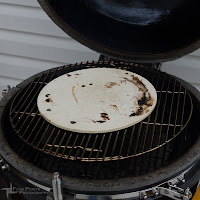
Barbequed pizza isn't new, nor is it restricted to the kamado style grill either. Many folks have tried pizza right on the metal grates of their barbeques with success before. I was not one of those lucky folks. I don't have an outdoor wood fired pizza oven either, but with my kamado grill, pizza was the second thing I made on it, and was thrilled with the results.
I have been making pizza from scratch for years now, and have a dough that works really well in the oven. This same recipe worked even better on the grill with the help of a pizza stone purchased at the local hardware store. My grill came with a lava stone too that can be placed below the stainless steel grills and will help dissipate the direct heat from the coals. I have previously found that the stone tends to keep the temperature in my kamado significantly lower than I would like, but I think tonight I will try it once more, but use more charcoal and let it warm up much longer before adding in the pizza. The idea there is to try to have as hot an oven as possible to cook the pizza really quickly. What may have taken 30 minutes in the oven should take only 5-10 on the kamado.
Sean's Pizza Dough
2 Cups unbleached flour
1 Cup warm water
1/2 Cup whole wheat flour
1 Tbsp sugar
1 Tbsp yeast
1 Tbsp wheat gluten (optional)
2 Tsp garlic powder
2 Tsp dried oregano or dried basil
1 Tsp salt
Add the sugar and the yeast to the warm water and let proof. Mix the remaining dry ingredients together, then add the water and knead by hand, or use a stand mixer or bread machine. Let rise for 60 minutes in a warm place or until the dough has roughly doubled in size. Flatten to one large pizza shell, or two 14" thin shells.
I use this same recipe in the oven with great success at 375°F for 20-25 minutes, but when used on the kamado grill with a slightly thinner crust, it comes out PERFECT. Nice crispy bottom with a soft chewy texture inside, golden brown color, and great taste. When letting the dough rise, I always find the best place to keep it warm and moist is inside a warm (not hot) oven. I will run my oven for a minute or two just to get the sides all warm, then turn on the oven light and leave the dough inside a mixing bowl covered with a moist tea towel. This regularly gets me results. The wheat gluten is an ingredient I have started adding to my bread recipes to help make the texture chewier. It isn't mandatory, but it does help, and you can find it in the baking isle of your local grocer.
The best part about pizza is that you can top it off with whatever you want. This can actually be a great (and healthy) way of clearing out the leftovers from the refrigerator too. Chicken, sausage, beef... it's all fair game. Ever try a bacon and egg pizza? Don't knock it until you have. Throw on hard boiled and sliced eggs, or 4-5 over easy, along with sliced bacon, maybe crumbled sausage, perhaps a ketchup sauce on the bottom. Salt and pepper to taste!
For my pizza tonight I'm using mozza cheese, cervelat salami, bacon, onion, bell peppers, garlic, and a homemade sauce made from canned whole tomatoes (my garden tomatoes haven't grown in yet), basil, garlic, thyme, oregano, salt and pepper, and a little white vinegar. (I blend them all together and let them simmer and reduce on the stovetop until a nice sauce-like consistency.)
The salami is pre-packaged, and quite tasty. The peppers and onions are bought fresh, cut, then frozen in ziplock bags until needed. My lovely wife fried up the bacon with the onions and the garlic before topping them on the pizza. The rest just goes right on top.
 |
| Pizza stone |
The grill got up to around 350°F by the time I was ready to cook with it, so I placed the pizza dough on the stone alone to pre-bake for 5 minutes. Then I removed it from the heat to add all the toppings before returning it once more to the kamado. By the time the pizza was finished cooking (about 12 minutes later) the kamado was starting to push 400°F. It might have gone higher, but for one pizza, I think the amount of charcoal I had to use might be disproportionate to the amount of pizza I was cooking. (I'm Dutch, so I'm naturally... frugal)
Anyway, the pre-bake I've used before, and it always works. After the 12 minutes or so, the crust was again perfect, and the flavor today was probably the best I've had yet. I owe that part to my wife. The bacon flavor was soaked up by the onions and garlic and permeated the pizza and sauce. It was magical. Another success!
Summary
Pizza dough
Pizza toppings
More Pizza toppings
Pizza stone
Make the dough as per the recipe, or use store bought dough. Prepare your kamado for 350°F or higher. At lower temperatures, pre-bake the dough for 5 minutes. Add all your toppings, finishing with a generous amount of cheese and bake in your kamado for 10-15 minutes, or until the crust is just browning. Let it rest for a few minutes before slicing and enjoy!
 | |
| That's right... It's pizza baby |


No comments:
Post a Comment